iOS/iPadOS 17 and later · Updated September 9, 2026
Weather Magic PWS for iPhone and iPad
Free app plus one-time purchased Pro. No station ownership required; use a supported nearby station for station readings. All widgets require purchased Pro.
This guide describes the prepared iOS release. The updated build is being prepared for App Store upload; availability will follow Apple review and release.
Open the detailed PDF (29 pages) Download PDF Mac editions and manualsWhat is new in this release
The iOS edition now uses a Free app plus one-time purchased Pro. Free has no time limit. Station ownership does not grant Pro; users without a station start Free and can purchase Pro later.
If you activate Pro without owning a weather station, you need a supported nearby station to retrieve station readings. Pro unlocks features and additional providers; it does not supply a physical station or its measurements.
Clear access and first-start choices
All seven widget types, every supported size, the in-app weather previews and Live Activity require a verified Pro entitlement. Locked widgets show a Pro-only message without weather readings. Additional provider accounts, custom limits, fallback, extended history, exports and Supabase remain Pro features. Primary station setup and built-in public feeds remain available in Free.
The required Privacy and Data Loss page explains data responsibility and the nearby-station requirement. Accept to continue; declining leaves setup and weather services paused. Keep and verify independent backups.
More accurate missing-data displays
Missing rain, UV and solar measurements display a dash instead of a measured zero. NWS hourly or three-hour rain amounts are not labeled as a daily total, and old NWS rainfall snapshots are not presented as yearly totals. These distinctions also apply to relevant history, reports and widgets. A real zero remains a valid reading.
Free Lightning displays its Pro lock. With Pro, missing lightning data is not presented as an all-clear result. OpenWeather freshness uses the original fetch time; reopening a cached reading does not make it current.
Manuals and recovery
More > Quick Guide contains short instructions and opens this full PDF offline. The guide includes provider setup links and screenshots, Free/Pro widget examples, a linked contents page, index, troubleshooting and backup procedures. Restore Purchase checks Pro access; it does not restore weather history or provider keys.
First start and consent
Weather Magic PWS works on a compatible iPhone or iPad running iOS/iPadOS 17 or later. You do not need to own a physical weather station: choose a supported nearby public station or a forecast location. Available data depends on the provider and your location.
Without your own station, all Pro features are disabled from the start. A verified Pro purchase unlocks them later; station ownership itself never grants Pro.
Install and begin
1. Install the released iOS app from the App Store. Open Weather Magic PWS. There is no processor selector or separate Mac installer on iPhone/iPad.
2. Read the required Privacy and Data Loss notice, including the nearby-station requirement for Pro users who do not own a station. Choose Yes - I accept to continue. No - I do not accept leaves setup and weather services paused; you can close the app or reconsider.
3. Complete the privacy and data guidance. Choose the station setup route appropriate to you. Provider passwords and Application Programming Interface (API) keys belong to the provider account holder.
4. For the simplest start, select a public station or a no-key forecast location. Configure optional purchased-Pro services later.
Before changing an existing installation
Back up your device first. Record your station names, IDs, Home selection and provider account details somewhere private. Keep provider keys in a password manager. Do not delete the app to fix a weather outage: deleting it can remove local history.
Confirming the notice is required before setup or weather services begin. This notice is separate from the older onboarding checkboxes and may appear once when an existing installation adopts the new notice revision. Accepting it does not purchase Pro or create a provider account.
Free and purchased Pro
The iOS edition has two access levels: the Free app and a one-time Pro in-app purchase. Free does not expire. This edition has no station-owner trial, manual activation code or owner-build bypass.
Capability | Free | Purchased Pro |
Saved stations | Up to 3 | Up to 20 |
Primary station setup and current readings | Included | Included |
Today graph / local history | Today / up to 7 days | Extended periods and history |
All Home and Lock Screen widgets | Locked | Included |
Night Stand display and Live Activity | Locked | Included |
Additional provider accounts / API keys | Locked | Included; provider access separate |
Custom limits, limit audio and fallback | Locked | Included |
Chart CSV/PDF/print exports | Locked | Included |
Supabase cloud tools | Locked | Included; configured project required |
How the widget gate works: no verified Pro purchase means “No data here - Pro version only” and no widget weather fetch. A verified purchase enables the widget to read or refresh the selected station. Losing that entitlement locks the widget again when its view/timeline refreshes.
A provider may offer a free service tier while the app feature that connects to it still requires purchased Pro. Pro buys app functionality; it does not buy third-party data subscriptions.
Find or connect a station
Without your own weather station
1. Open More > Add Station or More > Settings > Browse Public Stations. Search using the offered country and postal-code controls.
2. Review the map and station details. A public observation station reports measurements; an Open-Meteo location supplies forecast/model data. Choose according to the information you need.
3. Add the location and choose the Home station you want to follow. Refresh and check that its name, location and observation time are plausible.
With your own station
Use More > Settings > Connect a Provider. Choose the correct provider, enter the station identifier and required credentials, select units, then test and save. Weather Underground uses a station ID and API key. Ambient Weather uses its device MAC and the API/application-key format shown by setup. WeatherBug and WeatherCloud need their own authorized service credentials.
Manage your list
Use the saved station controls in Settings to select, edit, set Home or delete a station. Free supports 3 saved stations and Pro 20, subject to provider-specific limits. A provider-specific ceiling can be lower than the app ceiling. Editing a Free station preserves existing Pro limit settings but cannot change them.
Primary station credentials are allowed in Free. OpenWeather supplemental current conditions, AQI credentials and cloud configuration are additional Pro tools. Never put another person's password or API key into the app without their permission.
Pro without owning a station
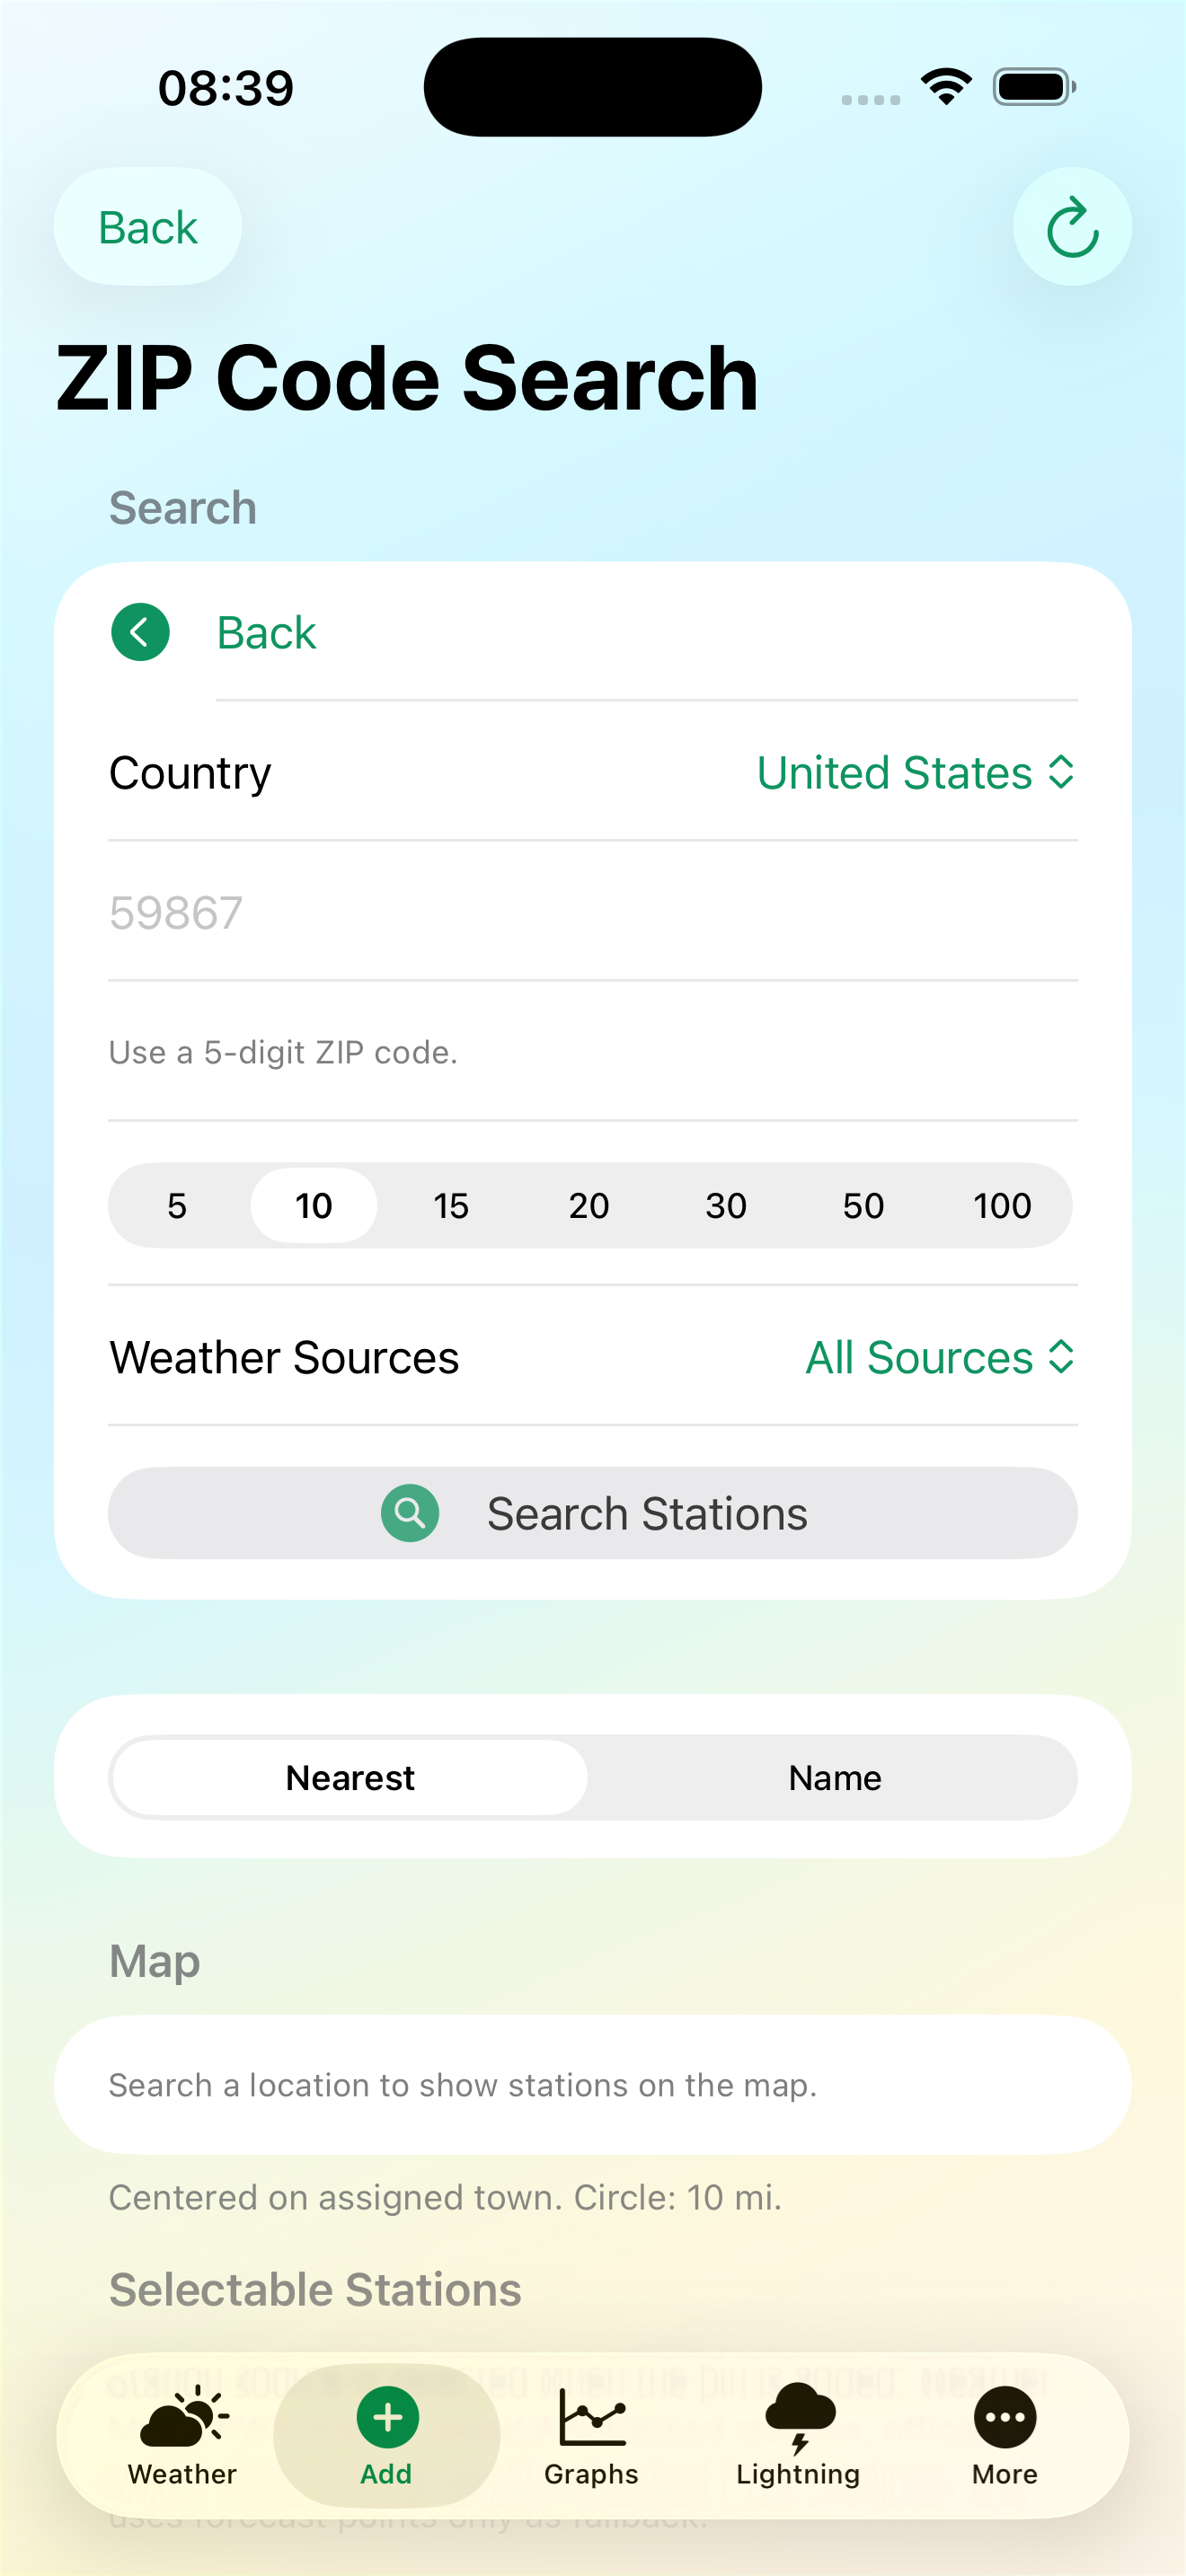 | Before buying Pro If you activate Pro without owning a weather station, you need a supported nearby station to retrieve station readings. Pro unlocks features and additional providers; it does not supply a physical station or its measurements. 1. Open More > Add or Settings > Browse Public Stations. Choose your country and postal code. 2. Choose the offered search radius and search. Inspect the station name, location and source before adding it. 3. Set the chosen station as Home. Confirm that it returns a recent observation. Nearby stations can be offline or may not expose every sensor. 4. Purchase Pro only when the available station/data sources meet your needs. Additional providers still need their own accounts and access. A forecast/model location can provide other weather information, but it is not a nearby station measurement. If no suitable station is available, Pro cannot create those missing readings. |
Saved iOS reference screenshot from the earlier review set. It illustrates public-station search; layout may differ in this updated build. The written purchased-Pro rules in this manual are current.
Read the weather dashboard
Start with the selected station name and its last observation time. Then read temperature, humidity, pressure, wind and station rain measurements. A saved reading can remain visible when a provider is temporarily unavailable.
Temperatures retain decimal readings where available. A dash means unavailable, not zero. Public NWS hourly or three-hour rainfall is not a daily total; daily and yearly totals remain unavailable when the source cannot supply them. Missing UV or solar stays unavailable. A genuine measured zero is preserved.
What you see | What it means |
PWS | Personal Weather Station measurements, subject to that station's sensors and provider. |
Wind direction and speed | Direction and movement reported by the station. Gust is a separate peak measurement. |
Rain rate / rain today | The station's rate and accumulated amount. A cloud icon does not replace the rain gauge. |
Supplemental condition source | Another service can supply the decoded weather condition and cloud information. |
OpenWeather age | Time since the app fetched the supplemental condition, separate from the PWS observation time. |
Missing / stale | Check the source and age. A missing value is not a measured zero. |
Refresh and compare
Open the app or use its refresh control. Compare the observation time with your current time. The app uses provider-safe refresh intervals, so repeated taps need not create a new measurement. If the station has not published a new timestamp, the same station reading may be shown.
Understand the cache
A recently fetched OpenWeather response keeps its original fetch time when reused from local storage. Reopening a screen does not make it newer. The iOS condition cache rejects stale or mismatched station/location data; its existing maximum age is one hour. Unknown or implausible future dates are not described as fresh.
Purchase and restore Pro
Make the one-time purchase
1. Open More > Weather Magic PWS Pro. Read the included features and the price loaded from the App Store.
2. Tap Unlock Pro and complete Apple's purchase confirmation. Canceling or a pending approval does not unlock Pro.
3. Wait for the app to show Pro active. It verifies the StoreKit transaction before enabling widgets or other Pro tools. Refresh the Home station once before adding widgets.
Restore on another installation
Use the Apple Account associated with the purchase, open the app and choose More > Weather Magic PWS Pro > Restore Purchase. Restoration checks the purchase; it does not restore weather history, provider keys or device backups.
The app accepts a verified entitlement supplied through Apple Family Sharing when available for your account. Family availability is controlled by Apple and purchase settings. A refund or revoked entitlement can remove access. The purchase is not tied to a station ID.
If Pro remains locked
Confirm the Apple Account, complete any pending approval and try Restore Purchase with a working connection. If Apple reports no eligible purchase, keep using Free while checking the transaction. Old trials, saved Boolean unlocks and local activation codes do not grant Pro in this iOS edition.
Wait for the app to show Pro active after restoration. A successful button action by itself does not create a purchase. If you have never bought Pro and have no eligible shared entitlement, continue with Free or make the one-time purchase.
The app and widgets check Apple's verified on-device entitlement. The widgets use a bounded purchase snapshot for rendering and recheck StoreKit before weather refresh. OS scheduling can delay the visible change on an already-rendered widget.
Add widgets to your device
Home Screen setup
1. Purchase or restore Pro in the app. Choose your Home station, refresh it and confirm the current reading.
2. Touch and hold an empty Home Screen area. Use Edit > Add Widget on current iOS, or the + control on older supported versions.
3. Find Weather Magic PWS in Apple's widget gallery. Choose a layout and supported size, add it, then finish editing.
4. Move the widget where you want it. Reopen the app to change the Home station or its provider settings.
Lock Screen and Nightstand
Nightstand 2 includes accessory rectangular, inline and circular layouts where the OS offers them. Add these through the Lock Screen customization controls. The other Nightstand layouts listed in this manual are large Home Screen widgets. Apple StandBy and the app's full-screen Night Stand display are different surfaces; available system placements depend on your device and OS.
When locked
Every layout, including the former Regular Free and Nightstand 1 layouts, shows a Pro purchase message without weather values. It does not start station/provider requests while locked. The in-app gallery follows the same policy.
Widgets are scheduled snapshots. The app requests refresh opportunities, but iOS chooses when they run. Opening the app and refreshing is the quickest way to check the latest available reading; it does not force an immediate widget redraw.
Free and Pro widget examples
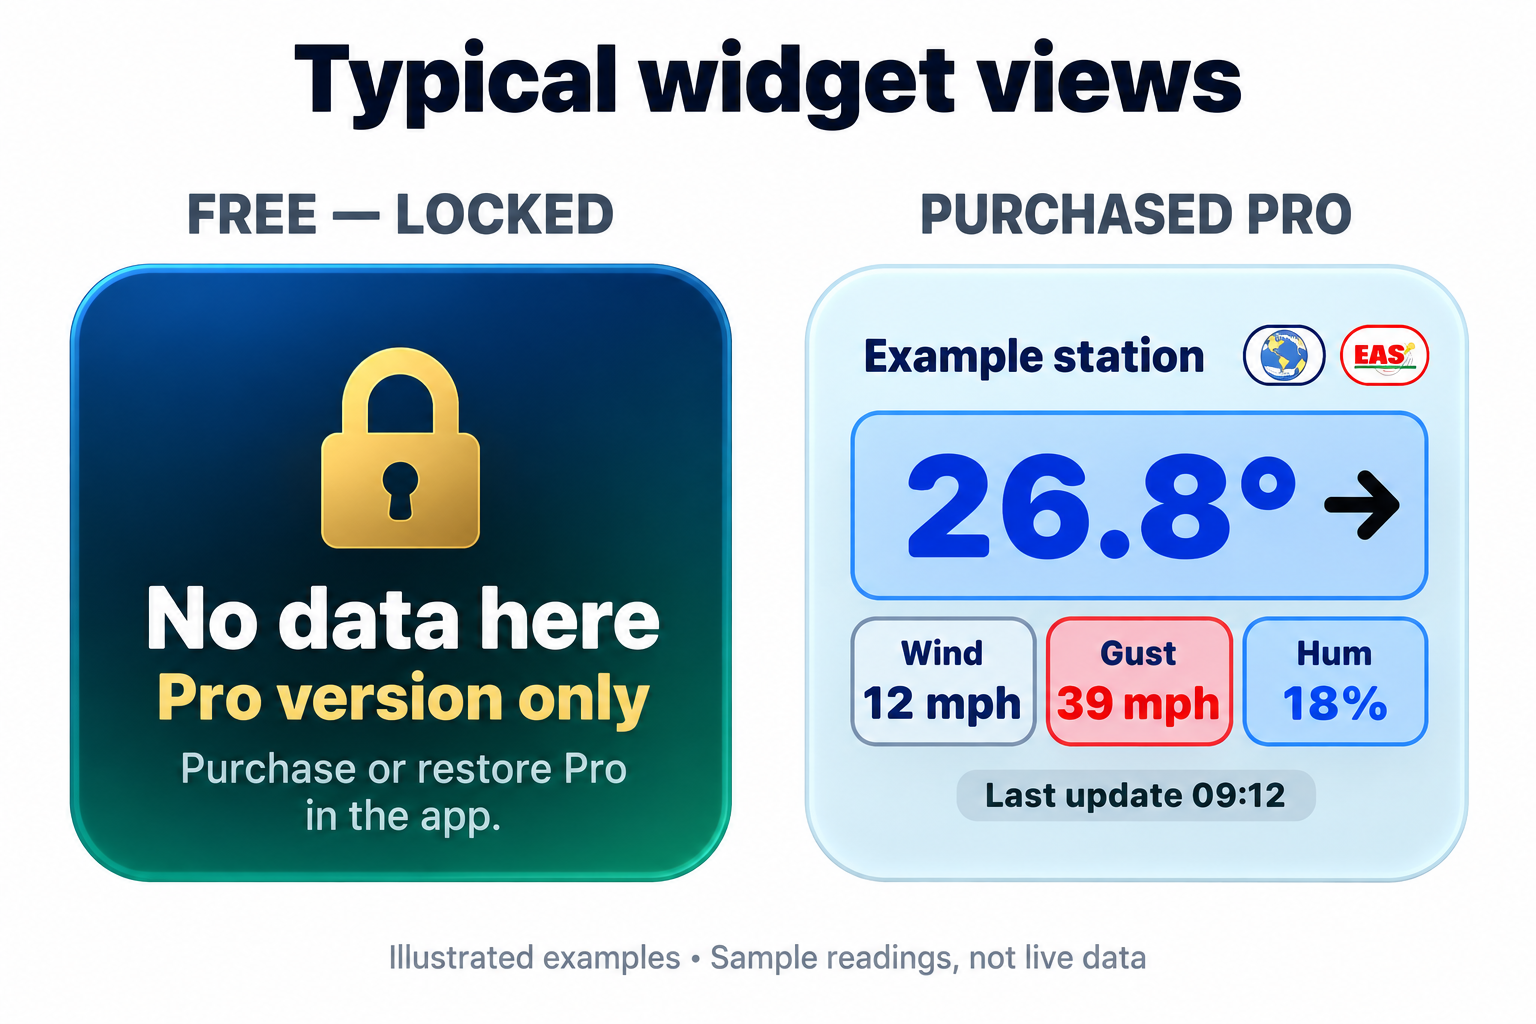
Free: no widget weather data
Every widget remains locked without a verified Pro purchase. Larger widgets show No data here - Pro version only. Compact Lock Screen widgets use a shorter Pro-only message or lock icon, with the full explanation available to accessibility. No station reading is shown or fetched by the locked widget.
Purchased Pro: selected-station readings
After purchasing or restoring Pro, open the app, choose Home and refresh. A widget can then display the available station data. The illustration uses sample values; actual fields and appearance depend on layout, size, station and iOS.
Without your own station, a supported nearby station is required for station readings. Pro cannot create missing measurements. OpenWeather and other supplemental data still require the appropriate provider access.
Illustrations are based on the app layout and are not screenshots of a live purchase test.
Widget reference
Widget in the gallery | Sizes / purpose | Access |
Regular - Pro | Small, medium, large station summary | Purchased Pro |
Weather Vane - Pro | Small, medium, large; wind-focused and enhanced weather layouts | Purchased Pro |
OpenWeatherMap Nowcast - Pro | Large; decoded condition, station rain and cloud layers | Purchased Pro + provider access |
Nightstand 1 - Pro | Large low-light station layout | Purchased Pro |
Nightstand 2 - Pro | Small/large plus supported Lock Screen accessories | Purchased Pro |
Nightstand 3 - Pro | Large; temperature, wind, gust and precipitation | Purchased Pro |
Nightstand 4 - Pro | Large; wind vane, maximum gust and alert pills | Purchased Pro |
Live Activity | Lock Screen / Dynamic Island where supported | Purchased Pro + enabled setting |
Data shown by widgets
Layouts share the selected station and app data. Pro status alone cannot supply missing sensors, a valid supplemental API key or lightning product access. OpenWeather Nowcast needs separate OpenWeather configuration; received lightning and AQI also depend on their sources.
Live Activity
Enable More > Settings > Live Activity - Pro if you want the supported system surface. iOS can limit or end it. The app ends Live Activities when it detects loss of Pro. Existing system snapshots may remain briefly until the OS redraws them.
The in-app widget gallery is a reference for choosing layouts. A template name or preview is not a second purchase. One verified Pro entitlement controls all of them.
Provider accounts and API keys
API stands for Application Programming Interface. An API key identifies authorized use of a provider service. Create the account on the provider's own site, obtain the appropriate access and enter the key only in the matching app field.
Provider / source | Account or key | App use |
Weather Underground and other owned-station providers | Provider credentials for your station | Primary setup available in Free |
National Weather Service | Public station/alert feeds; no personal key in app | Built-in Free feed |
Open-Meteo | No personal key for the built-in public endpoint; provider terms apply | Built-in forecast; Pro supplemental layers |
OpenWeather | Account and valid key; free/current tier has limits | Additional Pro provider |
AirNow | Public API account and issued key | Additional Pro AQI provider |
IQAir | Own account/key and suitable plan | Pro credential field; current AQI path prefers WU/AirNow |
Supabase | Own project, public client key and authenticated user | Optional Pro cloud tools |
Check service eligibility
Provider terms, coverage, quotas and fees can change. A free provider tier does not make the app's provider connector Free. Open-Meteo distinguishes public/non-commercial access from commercial service plans. Do not assume a blank key is a shared key or that buying Pro supplies one.
Configure OpenWeather
Create the account and key
1. Use OpenWeather's official API or FAQ page below to create an account. Complete any email/account verification the provider requests.
2. Open the account's API key area and obtain a key with Current Weather access. Allow for provider activation time; a new key may not work immediately.
3. In Weather Magic PWS, open More > Settings > OpenWeatherMap - Pro. Paste the key into the secure field and tap Save API Key.
4. Refresh the selected station. Check its coordinates and the OpenWeather source/age label rather than relying only on a weather icon.
What the current-weather connection supplies
The iOS client uses OpenWeather's current-weather endpoint for decoded conditions and associates the response with the station location. Supplemental cloud altitude layers use Open-Meteo. Station temperature, wind and rain gauges retain their PWS meaning.
Lightning is separate
A current-weather account or key does not automatically grant the required lightning product. Obtain the provider's appropriate lightning access before expecting strikes to appear. A zero count can mean no received event in the active window; it is not proof that the area is safe.
Key handling
The OpenWeather key is stored in the app's shared Keychain access group for the app and widgets. Device-bound Keychain protection means you may need to enter it again after replacing a device. Free cannot save or use the supplemental key; existing saved configuration is retained while locked.
OpenWeather account walkthrough
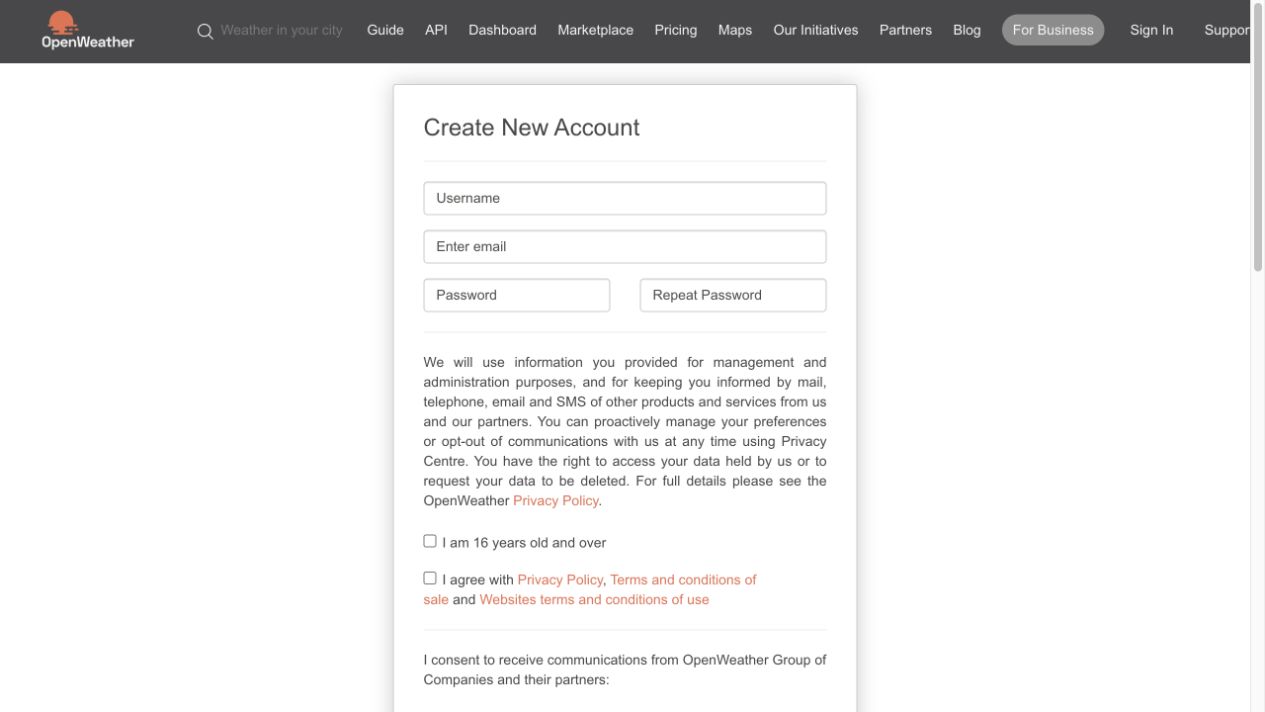
Public OpenWeather account form captured September 9, 2026. No account was created and no private key is shown.
1. Open the account link below. Enter your details and complete the provider's required terms and email verification.
2. After signing in, use API keys to obtain a key for the Current Weather product. Use the account's activation status to determine when it is ready.
3. In the app, open More > Settings > OpenWeatherMap - Pro, paste the key and tap Save API Key. Refresh Home and check the condition source and age.
Enables: decoded current-condition information and the OpenWeather Nowcast layout after Pro is purchased. The app keeps station rain, temperature and wind separate. Lightning requires the provider to authorize the lightning product on the key; purchasing Pro or obtaining a current-weather key does not grant it.
Air quality and lightning
AirNow setup
1. Open the official AirNow API site and follow its account-request/sign-in instructions. Obtain your account's API key.
2. Open More > Settings > Air Quality - Pro and enter the key in EPA AirNow API Key.
3. Refresh the station and inspect AQI source, reporting area and observation age. The current iOS path uses Weather Underground first and AirNow as fallback.
Read AQI carefully
AQI is a source observation tied to a reporting area and time. It can differ from a nearby station measurement or another service. A real zero and a missing observation are different states. Saved observations can remain visible as last known data when new data is unavailable.
Other AQI credentials
Settings also includes an IQAir AirVisual key field. Its presence does not override the current WU/AirNow selection path or guarantee a particular IQAir plan. Use the app's displayed source to identify the actual value.
Lightning range and history
In Settings, choose the supported lightning distance and strike-count hold period. The app uses station coordinates first and an available saved postal location as fallback. Range and count hold affect the view of received events; they do not expand a provider's detection coverage. Use official emergency guidance during severe weather.
AirNow account walkthrough
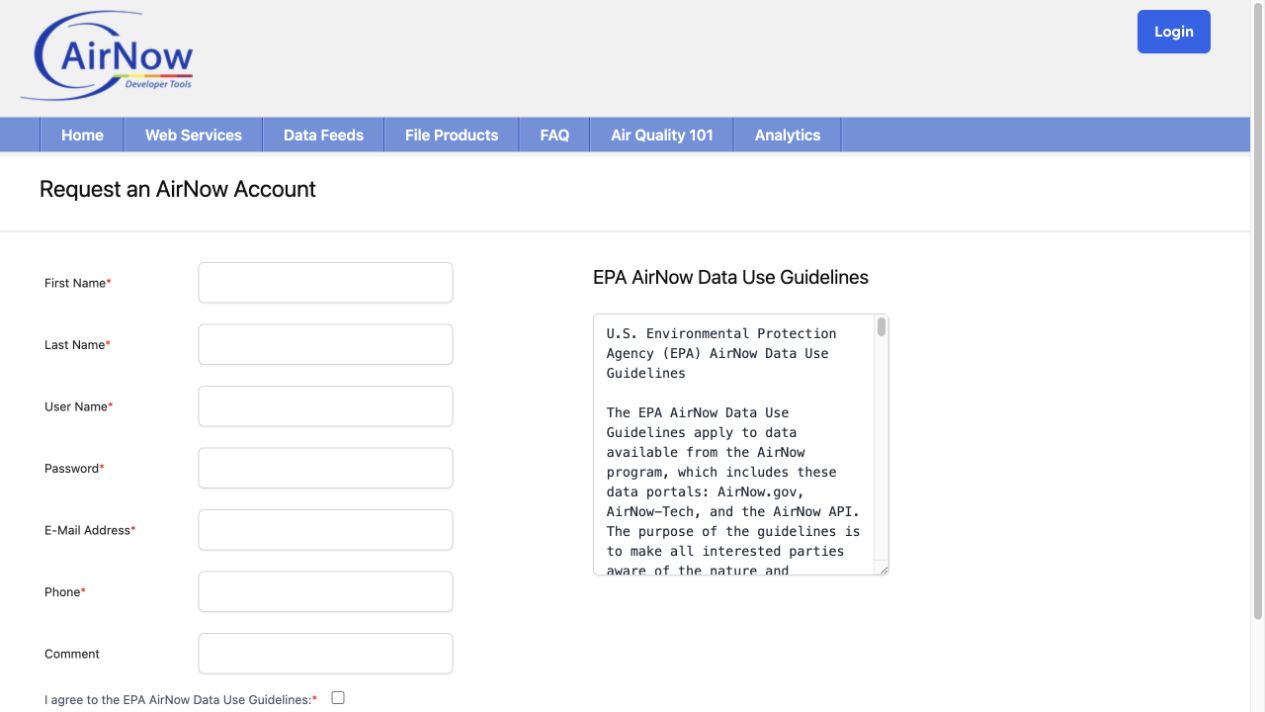
Public AirNow account-request form captured September 9, 2026. Complete it on the provider website, not in this PDF.
1. Open the AirNow API site, choose Log In, then Request an AirNow API Account. Complete the required contact details and review the data-use terms.
2. Submit the request yourself and follow the provider's account instructions. Sign in and obtain your API key.
3. After purchasing Pro, select a station in the app. Open More > Settings > Air Quality - Pro and paste the key into EPA AirNow API Key. Leave the field to finish editing and refresh the station.
Enables: AirNow reporting-area AQI when Weather Underground AQI is unavailable. It does not replace the weather station or guarantee an air-quality sensor at your house. The current iOS source preference is Weather Underground, then AirNow.
IQAir: access and current limits
What it provides
IQAir AirVisual offers city-level air-quality data, with features depending on the provider plan. Its provider API and the app's Pro purchase are separate products.
What this iOS build actually uses
The current automatic AQI route uses Weather Underground and AirNow. Saving an IQAir key does not select IQAir or enable an additional active AQI route in this build. Do not purchase a paid IQAir plan expecting it to change this app's displayed AQI.
If you already have a compatible key
1. Open IQAir's official API page below and inspect the service plans and account instructions. Confirm the available data, location and use limits with the provider.
2. If you already use an IQAir account, obtain its authorized API key through its account portal. Keep it private.
3. With Pro active, select a station and open More > Settings > Air Quality - Pro. The existing IQAir AirVisual API Key field can store it.
4. Treat this as saved configuration only. The app's AQI source label identifies the data actually in use. Use the AirNow steps for the active fallback route.
What it does not enable
The field does not grant a provider subscription, override Weather Underground or AirNow priority, create a nearby weather station, or supply station history.
Connect your Supabase project
Supabase is a separate service. The app's cloud features require purchased Pro plus a compatible configured project. You need the Weather Magic tables and authenticated per-user access rules; a brand-new empty Supabase project does not create these automatically.
Prepare access
1. Create or select your project in the Supabase dashboard. Use the project prepared for your Weather Magic data. Keep an independent backup before connecting another device.
2. Find the project URL and the appropriate public client key. This app labels the field Anon Public Key; use a compatible public key for the configured project. Never paste a secret/service-role key into the app.
3. Open More > Supabase. Enter Project URL and Anon Public Key, then choose Save Local Settings and Test Supabase.
4. Use the Auth area to create or sign into your data account. Complete any provider email confirmation. The dashboard-owner account and your app-data sign-in serve different purposes.
Confirm before syncing
Use Check Supabase Records and Refresh Data Health. Check that the account, station set and dates are the ones you intend to use. Read any read-only status shown by your build. Do not disable cloud security rules to work around a sign-in or record-permission error.
API key setup and cloud hosting plans are separate from Pro. Cloud sync is optional; the local app can be used without it.
Supabase setup reference
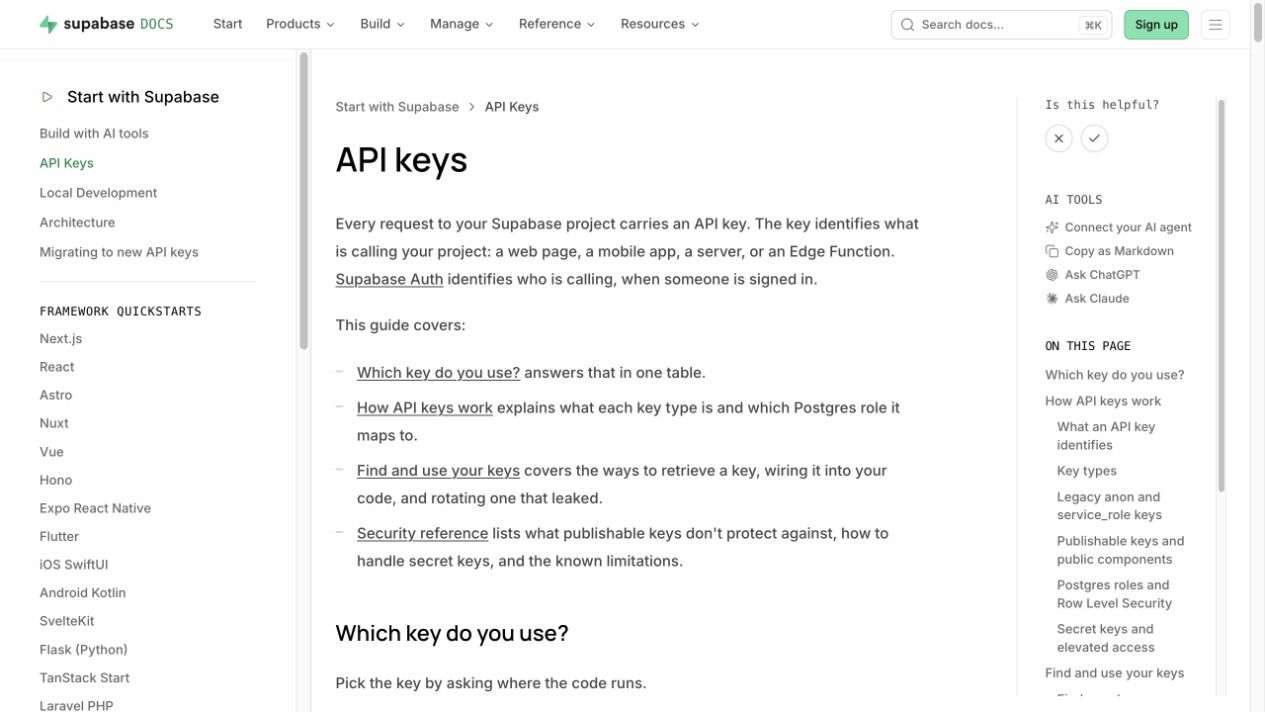
Public Supabase key documentation captured September 9, 2026. This is a documentation screenshot, not your private project dashboard.
Enables: optional cloud storage and transfer of station configuration, weather history, lightning and AQI records. It is not a weather feed and it does not replace a backup.
1. Open your project in the Supabase dashboard. Its Connect dialog or Settings > API Keys provides the connection values. This iOS build labels the key field Anon Public Key. Use the public client key compatible with the project; never a secret or service-role key.
2. In More > Supabase, enter the Project URL and key, save, and test. Sign into the app-data account separately. Confirm any email requested by the provider.
3. Check Supabase Records and Data Health before enabling sync. A project administrator must first prepare the matching Weather Magic tables and per-user access rules. Contact support if the project has not been prepared.
Push, pull and check cloud data
Control | Purpose |
Push Local to Supabase | Uploads the current local snapshot/rows to your configured cloud repository. |
Pull From Supabase | Loads available cloud station/history data into the local display database. |
Check Supabase Records | Reports the records visible to your authenticated account. |
Refresh Data Health | Updates local/cloud counts and latest timestamps. |
Use Supabase as primary cloud repository | Enables the offered ongoing sync workflow; observe the confirmation prompts. |
Choose the direction deliberately
For a new repository with the desired data already on your device, back it up, check the account and records, then use Push. For a new device joining a populated repository, keep automatic sync off initially, sign in, check records, and choose Pull only after confirming that the cloud contains the intended data.
Pulling saves cloud station configuration and imports plausible readings, lightning and AQI history. It can affect the local station list and Home selection. The current import path does not treat a chart export as a full backup, and a successful pull is not proof that every historical record exists in the cloud.
Compare matching units
Local Raw Weather Rows can be higher than Local 30-Min Weather Buckets. Compare cloud weather buckets with local buckets, and compare AQI/lightning counts within their own categories. “Cloud Sync Pending” and unequal raw-row totals do not by themselves prove data loss.
Stop if the station/account looks wrong. Preserve the device and repository before retrying. Do not push merely to make mismatched counts look equal.
Make and verify backups
Device backup
Free users should use Apple's device-backup options. For an iCloud backup, connect to Wi-Fi, open iOS Settings, choose your Apple Account, then iCloud > iCloud Backup > Back Up Now. Wait for completion and inspect the latest successful backup time. Check that the relevant app data is included.
For a computer backup, connect and trust the device, select it in Finder on a Mac or Apple Devices on Windows, and choose a backup. Use encrypted local backup when appropriate and keep its password safe. Confirm the completion time before disconnecting.
Keep a separate record
1. Record station IDs, provider names, units and Home selection in a private note. Keep credentials in a password manager rather than a screenshot.
2. If you use Pro, export important charts or CSV reports and open the saved files to verify them. These are portable records, not a complete restorable app database.
3. If you use Supabase, check the project's backup capabilities and retain an independent database backup where your plan/workflow permits. Cloud sync is not a substitute for backup.
4. Before a major change, keep the older backup until you have verified the new installation and its data.
The iOS app does not currently offer a complete local-database file export/import button. Do not follow a Mac-only “Manual Backup” procedure on this iOS edition. Device-bound API keys may need re-entry after restore.
Restore and verify the result
Before restoring
Identify the last known good backup and the data you need. A full-device restore can affect content beyond this app. Follow Apple's current restoration workflow for your device. Keep the original device or backup available until the replacement has been checked.
After device restoration
1. Open Weather Magic PWS and accept any pending first-start consent. Confirm the station list, Home selection, units and recent observation dates.
2. Use More > Weather Magic PWS Pro > Restore Purchase for Pro. Restoring the purchase and restoring weather data are separate operations.
3. Re-enter provider keys if the restored device cannot access the old device-bound credentials. Test primary station access before adding supplemental services.
4. If using Supabase, verify Project URL and the app-data account. Check records before pulling. Keep sync off while investigating an unexpected account or station list.
5. Refresh, inspect the Today graph and any important historical period, and compare saved report dates. Re-add widgets if required; verify Pro and the Home station first.
If a restore is incomplete
Do not repeatedly erase or overwrite the remaining good copy. Preserve backups and note exactly which station, date range or provider is missing. A PDF chart cannot recreate all records, and a CSV report is not accepted as a full app restore file.
Backup and cloud-sync features do not guarantee recovery. Provider history availability, local retention, device backup coverage and cloud plan limits all affect what can be recovered.
Graphs, reports and history
Today and extended periods
Open More > Graphs. Today is available in Free. Purchased Pro enables the offered 12-hour, week, month and year periods. Choose the metric and period together, then inspect timestamps and units. A gap may reflect absent stored readings rather than a rendering error.
Work with reports
1. Select the station, metric and date range you intend to share. Refresh if needed.
2. With Pro, use the available chart/export controls to create a CSV or PDF report, save to Files, share, or print.
3. Choose a destination you can find again. Open the saved report and check the station name, range, units and legibility before relying on it.
Database view
More > Database displays stored weather information and related Pro export controls. It is not the same as the Supabase dashboard. The local database supplies history and widget snapshots; the cloud repository is an optional separate copy/workflow.
Retention and interpretation
Free retains up to seven days of local history. Moving from Pro to Free can apply that retention limit, so preserve important records before a downgrade or a period without a verified purchase. Purchasing Pro later cannot reconstruct records that were never saved or were removed by retention.
Reports are useful for comparison and sharing. They are not a guarantee of sensor accuracy, continuous collection or full recovery. A weather provider can publish revised, delayed or missing data independently of the app.
Limits, alerts and fallback
Set custom station limits
Open the station editor in Settings. Under Weather Alerts - Pro, use the offered temperature, humidity, pressure and gust controls. Confirm units before saving. Choose the alert sounds and clear-alert options you want, then test and save the station.
Custom limits and limit audio require purchased Pro. A Free edit can still change primary station details, but it cannot change saved Pro limits. Existing limits are retained while locked. Public weather alerts and station-availability notices are separate from custom limit alarms.
Use fallback deliberately
In Settings > Manage Fallback Station - Pro, choose a saved fallback station and enable its use when Home is offline. A fallback observation is not a measurement from your Home sensor. Check the source, location and age when interpreting substituted data.
iOS notification controls
Local notification permission, Focus, Do Not Disturb, device volume and iOS scheduling can affect alert presentation. Enabling an app option cannot override the operating system. Live Activity is a display, not an emergency alert channel.
Keep public warnings separate
NWS/public weather-alert information and external forecast/radar pages may be delayed or unavailable. Follow official instructions during hazardous conditions. Do not use weather, AQI or lightning widgets as the sole basis for a safety decision.
Troubleshooting
Symptom | Checks to make |
All widgets are locked | Open Pro in the app. Complete or restore the purchase with the intended Apple Account. A trial or old activation code is not accepted. |
Pro app, but a locked widget | Open the app and refresh. Allow a widget update; if still stuck, remove/re-add the widget. Check the same device's purchase/account state. |
Widget not updating | Check the main app reading, Home station, network and source age. iOS can postpone timeline updates; do not assume a continuous timer. |
Station setup fails | Check provider, station ID, key format and account permissions. Try a supported public station to separate source access from general connectivity. |
OpenWeather missing | Confirm purchased Pro, saved key, account activation, Current Weather permissions and station coordinates. Lightning needs separate access. |
AQI missing or unexpected | Check source/reporting area and observation time. WU is preferred; AirNow is fallback. Missing is different from zero. |
Cloud has no records | Check project URL, app-data sign-in, confirmation email, table setup and row-access rules. Do not switch accounts or push blindly. |
History is shorter than expected | Check station/date range and Free retention. Compare reports and backups; purchase restoration does not restore weather data. |
Record the action that failed, any displayed error, station/provider name and relevant times. Hide credentials before taking screenshots. Keep a good backup intact while diagnosing the problem.
Provider troubleshooting
Problem | What to check / how to confirm recovery |
Pro active; no station readings | Confirm a supported nearby station is saved as Home and returns observations. Purchase does not provide a sensor. Try another authorized nearby station if the first is offline. |
OpenWeather current data absent | Check the key in OpenWeatherMap - Pro, save it, confirm account activation and Current Weather product permissions, then refresh. Recovery means a returned condition with a recent source age; a saved old reading is not proof. |
OpenWeather works; lightning absent | Current Weather and lightning are separate provider permissions. Confirm the lightning product, station coordinates and offered distance. No detected event can be legitimate; never assume a service is working solely because the count is zero. |
AirNow field absent | Select a station first. The Air Quality - Pro section is station-dependent. Confirm Pro, then enter the AirNow key and refresh. |
AirNow key saved; WU still shown | That is expected when WU AQI succeeds. AirNow is the fallback. Compare reporting area and observation time; do not expect the new key to override WU. |
IQAir key has no effect | This build stores the field but its automatic AQI selection does not call IQAir. Use the supported WU/AirNow route. |
Supabase test or sign-in fails | Confirm Project URL, compatible public key, app-data account and email confirmation. A dashboard login is not the app-data login. An administrator should inspect permissions without disabling data protection. |
Supabase signed in; no records | Check that the intended tables and per-user rules exist and the account owns the records. Confirm the project and station set before a push or pull. Empty cloud storage cannot restore local history. |
After one change, retry the affected feature and compare its source, timestamp and result. Keep working backups. Send support the error text and app build, but never an API key, password or secret.
Privacy, liability and support
Your data and credentials
Weather Magic PWS stores station configuration, readings and app settings locally and can share data with your chosen providers or optional Supabase project. The OpenWeather Keychain item is shared with the widget extension on the same device. A provider account is separate from your Apple purchase account.
Data-loss notice
To the fullest extent permitted by applicable law, BigSkyAstro accepts no liability for lost, damaged or unavailable data, including weather history, settings, backup files and cloud data, arising from installing or using Weather Magic PWS. You are responsible for maintaining and verifying independent backups. Backup and cloud-sync features do not guarantee recovery. This does not exclude liability that cannot lawfully be excluded.
Ask for help
Use More > Feedback to prepare a report, or contact support@bigskyastro.com. Include your device model, iOS version, app version/build, affected station/provider, action taken and whether Pro is active. Review the message and attachments yourself before sending.
Never include API keys, passwords, private cloud tokens or unredacted account pages. For purchase billing, Apple controls the transaction; for API activation or service permissions, the provider controls the account.
Manual edition
iOS purchased-Pro release edition, updated September 9, 2026. This guide covers iPhone and iPad with iOS/iPadOS 17 or later. Menu wording can vary slightly with device size and OS. The Mac installer, Intel final-revision notice and Mac trial policy are outside this iOS guide.
Alphabetical index
Use this index for a term or control. The table of contents lists whole chapters.
Account vs. purchase 13 API (Application Programming Interface) 13 Backup, device 22 Consent, Yes / No 4 Dashboard 8 Exports, CSV / PDF 24 Fallback station 25 Family Sharing 9 Free access 5 History retention 24 Home station 6 IQAir 18 Keys, provider 13 | Limits / alarms 25 Live Activity 12 Nearby station required 7 Nightstand widgets 12 No station owned 7 Pro purchase 9 Providers, enabled features 13 Public station search 7 Restore data 23 Restore Purchase 9 Support 28 Widgets, Free / Pro examples 11 |